Shinichiro Nishiya's Metasequoia LE Tutorials
back to tutorial index
Texture
Mapping
I think it is the most
difficult work to arrange texture mapping in the Metasequoia
operating.
Many people who are going to start to
modeling a plane feel difficulty on it.
I am trying
to show you an easier way to map a texture on the model.
Contents:
1
What is TEXTURE MAPPING?
2 Prepare a texture
file
3 Where to save the bmp-file?
4 The finished model with an accomplished texture
mapping
5 Load a texture file
6 Arrange a material setting
7 Get a
mapping frame
8 The view from the top with the
mapping frame
9 Input setting data for the mapping frame on
top view point
10 Mapping a texture on a main
wing
11 Mapping a logo on the bottom side of the wing
12 Flip the texture
13 Mapping on the side
of the fuselage
14 Summaries
15 How to rotate the mapping
frame
16 Useful website on texture
mapping
1 What is TEXTURE MAPPING?
When we paint a model
with color library of Metasequoia, we do as below.
1 Add a new cell in the
material panel
2 Arrange a color using color library
on the Material property panel
3 Check the button
[Move] is ON in the Command panel
4 Enclose the area
that you want to paint using Rc (rectangle) or Rp (rope) they are in Edit Option
panel.
5 Click [Selected] in the upper status bar and
select [set material to the faces] in the pull-down menu.
This is a case of solid color painting.
You can also paint logos and stripes on the plane by using texture
files.
You can also map a photo of a real plane.
That makes your
models more beautiful and more realistic.
This is texture mapping.
2 Prepare a texture
file
This is a sample file of [LitePT19] that I
made before.
We use a bmp-file.

I use bmp-files at the size in 256 x 256 pixel.
Actuary, you can
use 512 x 512 or 1024 x1024 but they are big data and this is not good for
smooth action of the model in FMS simulator.
Smaller data is better
for the simulator frame rate.
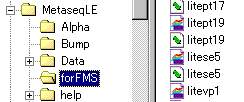
3 Where to save the
bmp-file?
Save the bmp-file in the folder where
the model's mqo-file had been saved before you do this texture mapping
work.
You can use other file name
but if you do so, you will pay much effort to find in lots of
files.
You will forget if you name it other name. I recommend you to
use the same name of the mqo-file.
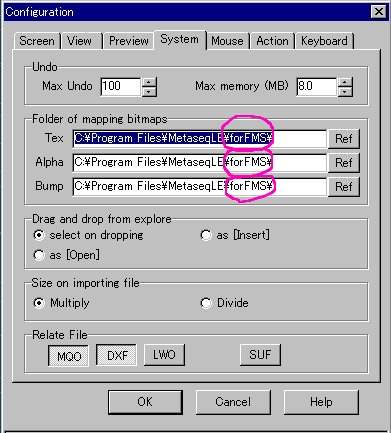
Important:
Before you create a model data by
Metasequoia, you should create a new
folder for mqo-files and bmp-files.
And you have to
register the folder into Metasequoia.
Click [Configuration]
and go to [Folder of mapping bitmaps], then fill the 3 blanks [Tex] [Alpha]
[Bump] with your own folder tree (path) by [Ref] button.
Mine is
for FMS
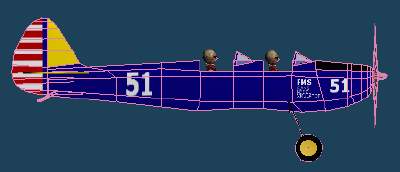
4 The finished model with an accomplished texture
mapping
We are going to map a texture file like this. (You can
download this model. here)
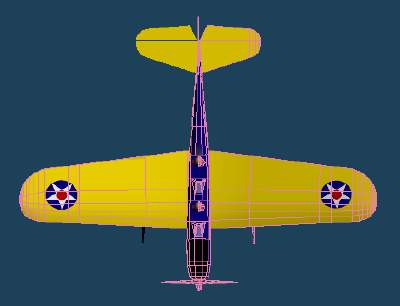
Change
the point of view
Pressing
F2-key
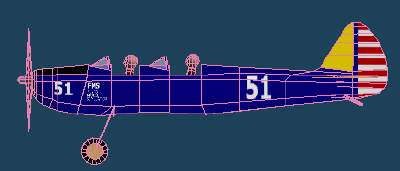
Change the point of view
Pressing F1-key

Change the point of view
Pressing SHIFT + F2-key
Change
the point of view
Pressing SHIFT +
F1-key
5
Load a texture file
1) Create a new cell in the
material panel.
2) Click the cell and the Material property panel will be
appeared.
3) Name it [texture] for example.
4) Load a bmp-file from the
blank [tex] in the Mapping window.
5) Click [Ref] and load the
bmp-file where the mqo-file (litePT19.mqo) had been saved too.
Notice:
You should save the bmp-file in
the folder that the mqo-file of the model had been saved.
Or, your own path (folder tree) will be recorded and it makes an
error.
You can see the texture only in your
PC.
If somebody downloads your model he can't see the
texture, the model will be in white.
In this case you can see [litept19.bmp]
in it.
Check it out that it is not a
path.
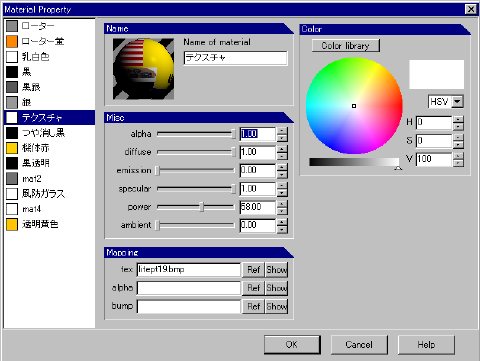
6 Arrange a material
setting
Basically, I input in the blanks as
following data in the Material Property.
alpha /
1.00
diffuse / 1.00
emission / 0.00
specular /
1.00
power / 1.00
ambient
/ 0.00
After this setup I arrange only
[power]
This sample plane is a foamy park flyer so I
make [power] smaller because I feel it is a little bit shiny at
power:1.00
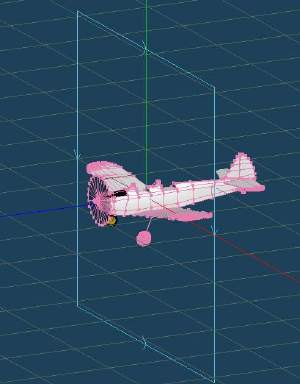
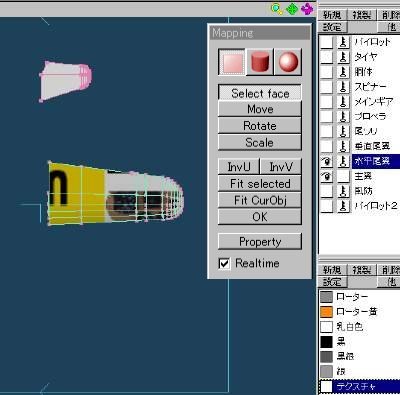
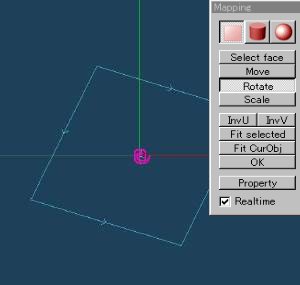
7 Get a mapping
frame
1)Blink the texture file in the Material
panel.
2)Click [Map] button in the Command panel. The blue square frame will
be appeared.Its default position is shown as below.
3)This is a Mapping frame and it indicates a texture.
4)We
don't use the frame at this position except when we map pilots, meter panels and
so on, because we use Metasequoia as a tool of modeling planes now, it is
limited use for Metasequoia.
What positions of the mapping
frame will be required?
One is the top view position
and other one is side view poison.
We set the frame in these only two
position and then slide, expand, redact the frame to adjust the
texture.
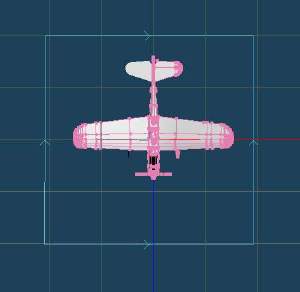
8 The view from the
top
Change the view from the top
usingF2-key
We
need an operation to make the mapping fame horizontal.
9 Input setting data for the mapping frame
1) Change the view point pressing F2-key
2)
[Map] button ON in the Command panel
3)
Click [Property] button in the Mapping panel
4)
Fill the blanks of Angle as below
Head : -180 (or
180)
Pitch : -90
Bank : 0
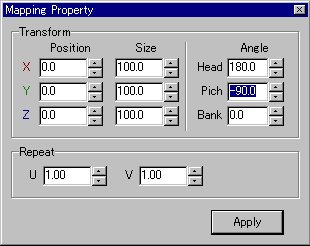
5) click [Apply] and [x
]
I am afraid that you will feel some difficulty
on this operation, but you can get the correct position of the mapping
frame.
I recommend you to do this way.
Notice:
When you input the data into the
blanks,don't use Delete
key.
This will make
delete the part of the model. (Use [Undo] in the Edit panel. You can recover it
easily.)
Blink it in blue by putting a cursor in the box, then input
data directly.
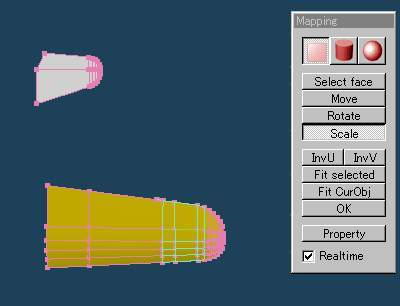
10 Mapping a texture on a
main wing
1)
Unlock the cell in the main wing on the object panel
2)
Click [Select face] button in the mapping panel
3)
Enclose hole of the main wing, and confirm the wires are turn to
green.
4) Click [Selected] that is in the status bar, drag to [set material
to the faces]
1)Check
the blank of [Realtime]
2) Click [Move] button, and
drag the mouse slightly.
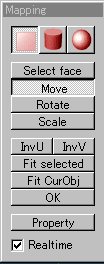
Now, we are starting a mapping work.
Try to arrange the mapping by
using [Move] and [Scale] button.
The texture on the main wing will
change by left button dragging.
After some dragging
[Move] and [Scale], all of the main wing will turn to yellow. (that it basic
color of the bmp-file)
Then click [OK] to fix the
mapping.
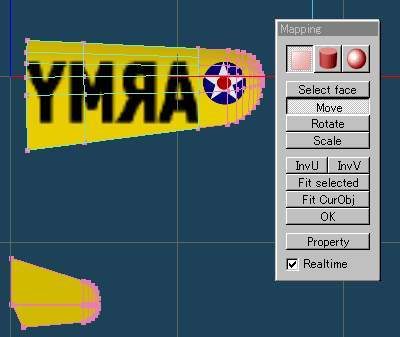
Next we are going to attach a star circle on it.
Click [Select face] of the
mapping panel, and then enclose the area that we are going to put the
star.
The wires on the area that has been selected
turn to green.
Click [Move] and drag a little bit, the texture will
move.
We need to arrange the
position and the size with [Scale] button.
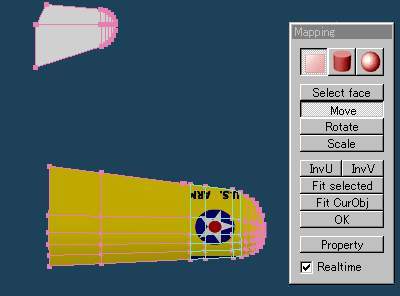
It requires rotating the
star a little bit, and we fix it.
We don't use [Rotate]
button, enter from [Property] button.
Input 90 degrees into
[Head] of the Mapping property panel.
And arrange with [Scale] and
[Move]
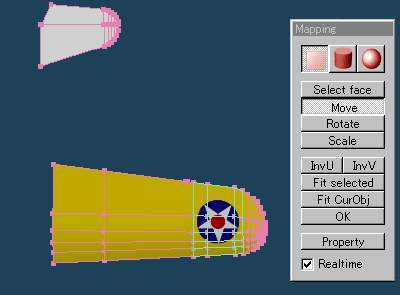
Then fix it with [OK]
We finished it as
above.
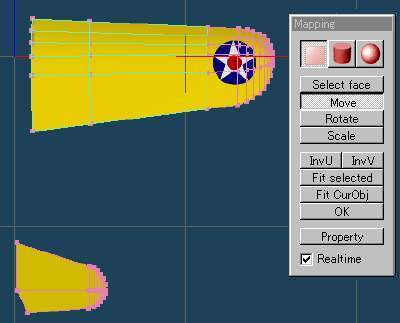
11 Mapping a logo on the
bottom side of the wing
Turn the viewpoint by
SHIFT+F2-key.
We are going to put the
logo "U. S. Army"
The position of the mapping
frame should be horizontal.
You need to turn
[Fr](front) button ON not to change the texture on the topside of the
wing.
[Fr] doesn't means front
side, it means the face you are watching now.
If you attach deferent
texture between top side and bottom side, you have to confirm this button turn
ON or OFF, or you will be much disappointed to find the reverse side face had
changed against your will.
Click [Select
face]
Enclose the area where we
are going to put the logo.
Change the
point of view
Pressing SHIFT +
F2-key
Click [Move] button and drag, the bmp-file
texture will be appeared.

After arrange the size and the position of
the logo, you will find that the logo is wrong side.
12 Flip the
texture
In this case, we need to
flip the bmp-file horizontally.
Click [InvU] button in the Mapping
panel.
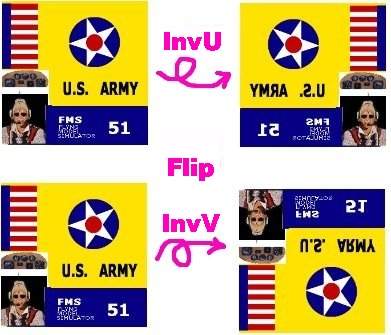
After flip it,
arrange the size and the position of the texture.

13 Mapping on the side
of the fuselage
1) Change it to the side view.
2) [Map] button ON in the
Command panel.
3) Click [property] in the Mapping panel.
4)
Input data into Mapping property panel.
5)
Fill the blanks of Angle as below
Head :
90
Pitch : 0
Bank :
0
Change the point of view pressing
F1-key
Notice:
Check
[S] (Screen) button in the Edit panel is selected to move the frame upward and
downward.
6) You can attach numbers and
logos in the same way in main wing mapping as shown above. Enclose an area where
you want to put them and attach.
7)
Change the point of view by pressing SHIFT +
F1-keyand put the flipped texture on.
8) The basic work and procedure on the
fuselage is same in case of a wing mapping.
Information:
You can make stripes longer
by enlarging a bmp-file. Select [Scale] and drag.
Also you can make
stripes wider and narrower.

14
Summaries
1) You can do texture mapping
with only two view point and two mapping frame position.
2) [Select face] >
[Scale]>[Move]>[OK]>>> [Select face] >
[Scale]>[Move]>[OK]>>> Repeat these steps
carefully.
3) Check [Fr] button ON or
OFF before attaching, or you will be disappointed when you take a look at the
opposite side.
4) A bmp-file is not necessary to be a photograph. Arranging
scale of the bmp-file and selecting parts of mapping areas will give you good
paitwork.
15 How to rotate the
mapping frame
I have explained you how to
put a texture without rotating the mapping frame.
Sometimes you need to
rotate a mapping frame.
You may want to get a
little bit more slants on attaching a stripe to the fuselage.
Let's plactice to rotate a mapping
frame.
Get the mapping frame without file
loading.
Tips on rotating a mapping
frame
I advice you to understand
that there are two actions to rotate a mapping frame.
One is falling down the
frame, and one is spinning a frame.
I recommend you to practice
these two-operation separately.
Click [Rotate] in the
Mapping panel and try left-button dragging.
You wil find that the center of the farame
has been fixed after you rotate it.
Fall the mapping
frame down toward horizontally.
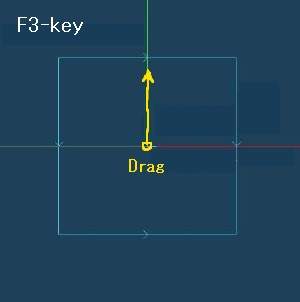
Press F3-key
It becomes front view.
Put the cursor on the
Y-axis (green line) and drag it upward
The mapping frame falls
down horizontally. (It rotates around X-axis)
Try dragging just on the
lines X, Y and Z-axis.
The center cross of the mapping frame will
be a good indicator showing you how much is the frame slants.
If the mapping frame face
has no slant, the center cross (figure [Y]) will be like a figure
[L]
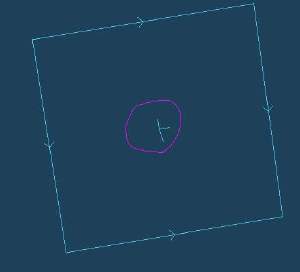
Like a disc spin rotating
If you drag a mouse in
very, very small circle, the fame will spin slowly like a
disc.
Do circle dragging in
opposite direction that you think as a natural sense.
If you feel to spin the
mapping fame in anti-clock wise, you have to drag the mouse in clock
wise.
This will make you
confused. (I was confused very much.)
Very small circle dragging will help you on
this practice.
Notice:
You don't need
to put the cursor on the center when you try this circle
dragging.
16 Useful website on
texture mapping
RC airplane Experimental Aterier (Author:
Mr. Sekiai)
Modeling for
FMS with Metasequoia
Q&A
of Metasequoia and other moering techniques(including a pilot mapping
technique)
back to tutorial index